Probe drivers
Ashling Vitra-XS, Opella-XD and Opella-LD probes need a USB driver (Windows) or USB access rules (Linux) before the debugger can use them. The driver files come with the SDKs that support those probes.
You don't need probe drivers to debug on the QEMU simulator.
Windows
Remote windows
Drivers are installed on the computer the probe is plugged into. They can't be installed from a VS Code window connected to WSL, SSH or a container. Open VS Code locally on that computer instead.
Automatic install after installing an SDK
When you install an SDK in the SDK Manager, the extension checks whether this computer has the probe drivers the SDK needs. If a driver is missing, or an older version is installed, a message names the SDK and the drivers it needs, and says that Windows will ask for administrator permission.
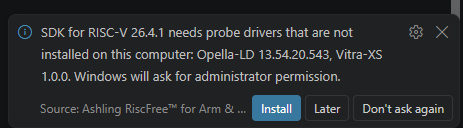
| Button | What it does |
|---|---|
| Install | Installs the drivers. Windows asks for administrator permission first. |
| Later | Asks again the next time you install an SDK in the SDK Manager that needs these drivers. Selecting an SDK for a project or reloading VS Code doesn't ask. You can also install them later. |
| Don't ask again | Stops asking about these driver packages, for every SDK. You are asked again if an SDK needs a newer package. |
A driver that is already installed at the same or a newer version is never replaced.
When the install finishes you see Drivers installed. Reconnect the probe. If Windows needs a restart to finish, the message says so.
To check that it worked, reconnect the probe and open Device Manager: the probe is listed without a warning sign. Once you have a project, it also appears in the Debug probe list of the Debug Configuration panel.
Microsoft Visual C++ Redistributable
Some SDK tools need the Microsoft Visual C++ 2015–2022 Redistributable (x64). If the SDK includes it and this computer has an older version, or none, a second message asks you to install it after the probe-driver message, with the same Install, Later and Don't ask again buttons. Installing it needs a second administrator approval.
Without administrator rights
If you can't approve the administrator prompt for the probe drivers, you see the message Installing probe drivers needs administrator rights. Select Copy command for IT to copy the installer commands, one line per driver, to the clipboard. Send them to your IT administrator, who runs them in a Command Prompt opened with Run as administrator.
Open driver folder opens the folders that hold the driver files, if your administrator prefers to install them another way.
The Visual C++ Redistributable message only offers Retry. Ask your IT administrator to install the Microsoft Visual C++ 2015–2022 Redistributable (x64), either from Microsoft or with the VC_redist.x64.exe installer that comes with the SDK (search the SDK root folder for it).
Install the drivers later
Use either of these:
- In the Ashling Project View, right-click the project's SDK Selection row and select Ashling: Install Probe Drivers for This Project's SDK.
- Open the Command Palette (Ctrl+Shift+P) and run Ashling: Install Probe Drivers for This Project's SDK.
Both need a project with an SDK selected (see Import or open a project and Select an SDK); without one you see No SDK is selected for … Select one first. From the Command Palette, the command uses the only project in the workspace, or asks which project if there are several.
It installs the drivers of that project's SDK, and tells you if everything is already installed. It installs straight away, without the Install / Later message, even if you selected Don't ask again before.
If you have no project yet, the simplest way to get the message again is to install an SDK that needs the drivers.
Logs
Every driver check and install is logged in the Ashling Drivers output channel: View → Output, then select Ashling Drivers in the drop-down.
Linux
On Linux the probes use libusb, and a udev rules file gives user accounts on this computer access to them. Set this up once per computer. You need sudo rights.
1. Install libusb
2. Find the Ashling udev rules file
The rules file, 60-ashling.rules, comes with the Ashling SDK for RISC-V, Arm AArch32 and Arm AArch64. Install one of them first, then locate the file in the SDK root folder:
- If several paths are listed, use any one; the files are the same.
- If nothing is listed, none of those SDKs is installed yet. The QEMU SDK doesn't need the rules and doesn't include them.
- If you changed the SDK root folder, search there instead of
~/.vcpkg.
3. Review the access rights (optional)
By default the rules give all users read and write access (MODE:="666") to these USB devices:
| Probe | USB vendor:product ID |
|---|---|
| Vitra-XS | 0b6b:0050 |
| Opella-XD | 0b6b:0010 |
| Opella-LD | 0b6b:0040 |
The file also has a rule that gives the same access to every USB device with Ashling's vendor ID, 0b6b.
To limit access to a group instead:
-
Copy the file to your home folder, where you can edit it:
-
In
~/60-ashling.rules, change everyMODE:="666"toMODE:="660", GROUP:="plugdev". -
Create the group if it doesn't exist (Fedora and RHEL don't have
plugdevby default), and add yourself to it: -
Log out and back in so the new group applies. Then, in step 4, install
~/60-ashling.rules, not the original file.
4. Install the rules
- Disconnect all Ashling probes from the computer.
-
Copy the rules file and reload udev:
sudo cp "$(find ~/.vcpkg/artifacts -name 60-ashling.rules -print -quit)" /etc/udev/rules.d/
sudo udevadm control --reload-rules
sudo udevadm trigger
If you made a restricted copy in step 3, copy that file instead:
sudo cp ~/60-ashling.rules /etc/udev/rules.d/. If you changed the SDK root folder, replace~/.vcpkgwith it. -
Reconnect the probe.
5. Check the probe is detected
List the probe and note its bus and device numbers:
Then check the access rights on the device file, using the bus and device numbers from the lsusb line (for example Bus 001 Device 007):
With the default rules you see crw-rw-rw-. With a restricted copy you see crw-rw---- and the group plugdev. Anything else means the rules didn't apply: unplug the probe and plug it in again, and check the file is in /etc/udev/rules.d/.
In VS Code, the probe now appears in the Debug probe list of the Debug Configuration panel. Select the refresh icon if the panel was already open.