Install and manage SDKs
An SDK bundles the tools a project needs for one target family. You install, check, update and remove SDKs with the Ashling SDK Manager.
Each SDK is made of components, shown as chips in the SDK Manager. A component holds one or more tools, the programs the SDK Manager starts to check that the component works. Which components an SDK has depends on its targets:
| Component (as shown) | What it is |
|---|---|
riscv-toolchain and other …-toolchain |
The compiler toolchain and GDB |
gdbserver-riscv and other gdbserver-… |
The Ashling GDB server, for hardware debugging |
qemu |
The QEMU simulator (Ashling SDK for RISC-V QEMU only) |
build-tools |
CMake and Make |
cli |
The Ashling command-line tools |
examples |
Example projects you can import |
opella-ld, opella-xd, vitra-xs |
Probe drivers (Windows) |
udev |
The udev rules for probes (Linux) |
vsruntime |
The Microsoft Visual C++ Redistributable (Windows) |
Open the SDK Manager
Use any of these:
- Select the Ashling icon in the Activity Bar, then under Quick Settings select SDK Manager.
- In the Ashling Project View, select a project's SDK Selection row, then Download more SDKs…
- Select Open SDK Manager on a No SDK installed message.
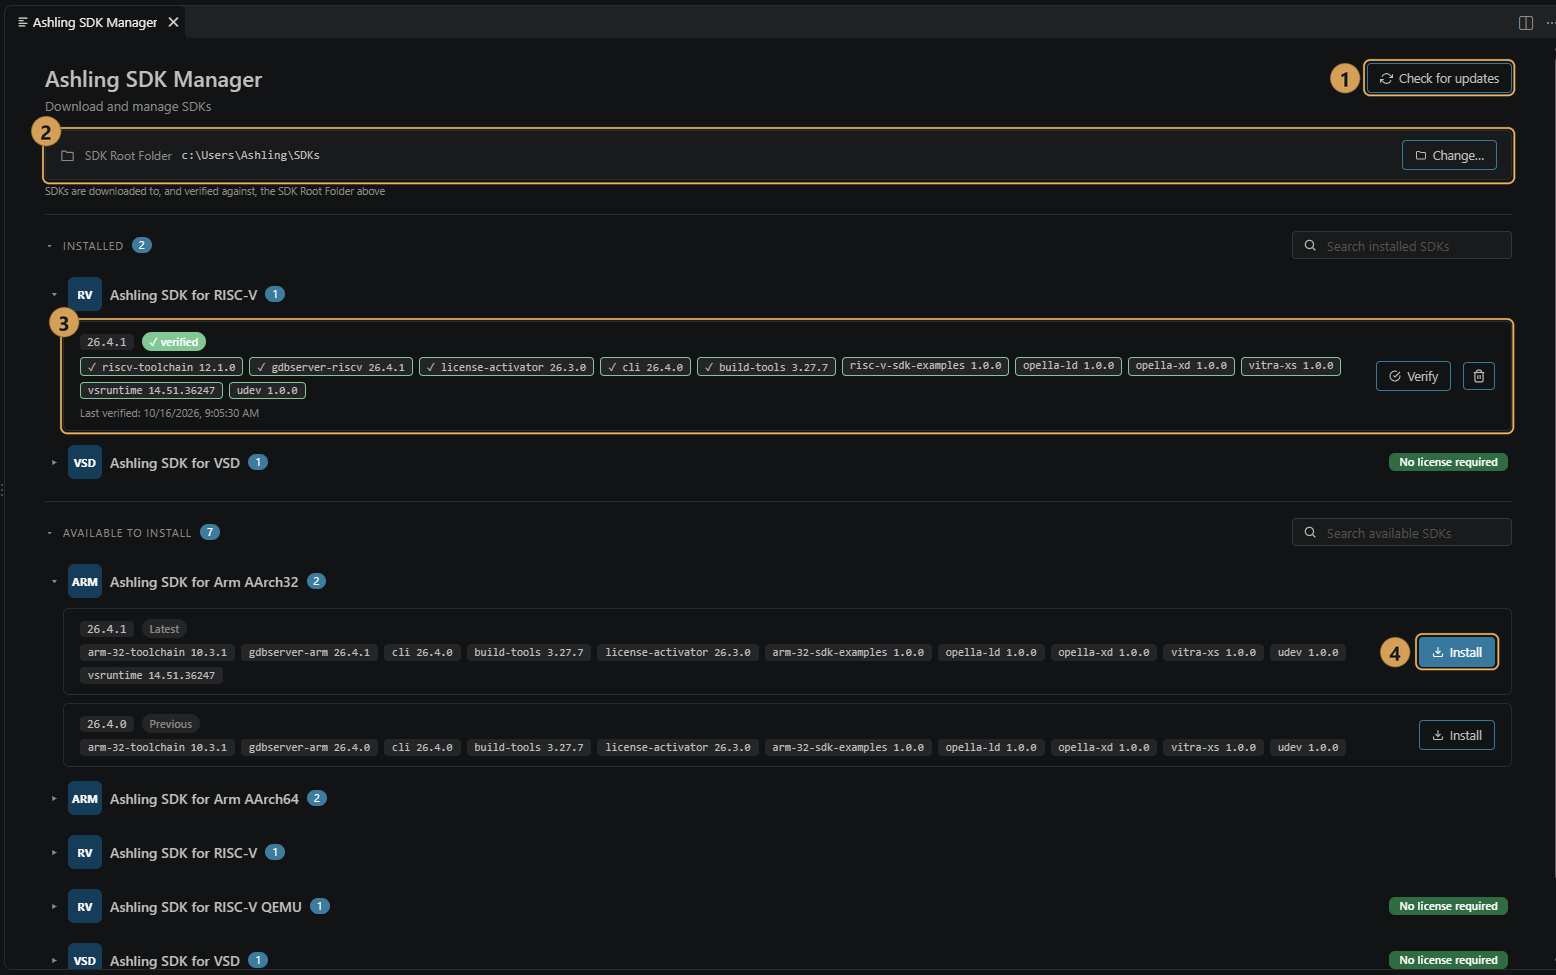
- Check for updates ① downloads the latest list of SDKs and versions from the Ashling registry. The list is downloaded automatically the first time; after that, it changes only when you select Check for updates.
- The SDK Root Folder ② is where SDKs are installed. Select Change… to use a different folder.
- Installed ③ lists the SDK versions on this computer, with their components and verification status. A verified tag means every component passed its check.
- Available to install lists the SDK versions you can install that aren't installed yet. Select Install ④ next to a version. An SDK can appear in both lists when one version is installed and another isn't.
SDKs that aren't built for your operating system aren't offered. For example, the Ashling SDK for VSD is Windows only, so it doesn't appear on Linux.
SDKs are grouped by name, and each group can be expanded or collapsed. Use the Search installed SDKs and Search available SDKs boxes to filter a long list. Hover over an SDK's name to see its description, or over a component to see what that component is.
Install an SDK
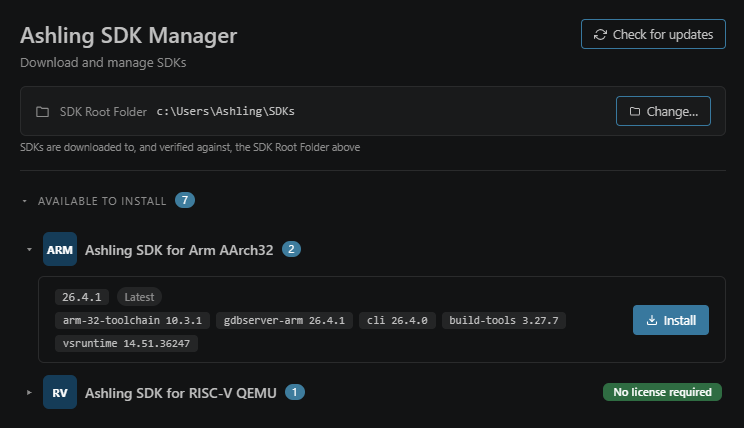
- Select Check for updates so the list is current.
- Under Available to install, expand the SDK. Each version is tagged Latest or Previous, and lists the components it contains.
- Select Install next to the version you want.
A notification shows the progress. Each SDK is a 0.6–1.1 GB download (see Supported SDKs), so it can take several minutes; select Cancel to stop. A cancelled install leaves the SDK under Available to install; install it again to start over.
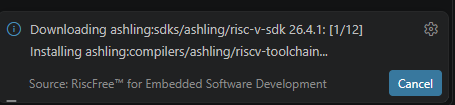
When the install finishes, the SDK moves to Installed. Then, depending on your operating system:
If the SDK needs probe drivers or the Microsoft Visual C++ Redistributable, and they are missing or older on this computer, you are asked to install them. Installing needs administrator approval. If you select Later, you are asked again the next time you install an SDK that needs them, or you can install them later yourself. See Probe drivers.
Probe access on Linux is set up once by hand. See Probe drivers.
Note
Installing an SDK doesn't change any project. To use it, import one of its examples or select it for a project.
SDKs that need no licence
SDKs that don't need a licence, such as Ashling SDK for RISC-V QEMU and Ashling SDK for VSD, show a green No license required tag. You can build and debug with them straight away.
Verify an SDK
Whenever the SDK Manager opens or refreshes, it checks the installed SDKs in the background by starting each component's tools. Tools whose files haven't changed since the last check aren't run again. Select Verify on an SDK to run all its tools again.
| Status | Meaning |
|---|---|
| verified | Every component is present and its tools run. |
| warning | Every component is present, but one or more of their tools are missing or reported a problem. Select a component marked to see the issue. |
| incomplete | One or more components are missing. They are outlined in red. |
| failed | The last download or activation of the SDK failed. Hover over the status to see why. |
| unverified | The SDK is in the SDK root folder, but this extension hasn't downloaded or activated it there, for example after you changed the SDK root folder. It changes once you select the SDK for a project. |
Activating an SDK is what happens when you select it for a project: any missing components are downloaded, and the project is set up to use it.
Each component appears as a chip with its version. A tick means its tools ran without problems. Components without tools, such as examples and drivers, aren't run; they just have a green outline.

Repair an SDK
Verify doesn't download anything
The SDK Manager's messages say Click Verify to download it again and Click Verify to retry. Verify only runs the tools again; it doesn't download or repair anything. Use the steps below instead.
- incomplete: select the SDK for a project. Missing components are downloaded when the SDK is activated. If no project uses the SDK, remove it and install it again instead.
- failed: select the SDK for a project again to retry. If it keeps failing, remove the SDK and install it again.
- warning because a tool file is missing or damaged: remove the SDK, then install it again.
An antivirus program that quarantines SDK tools can remove files. Restore them, or exclude the SDK root folder from scanning, before you install the SDK again.
Get a newer version of an SDK
When Ashling publishes a new version of an SDK:
- Select Check for updates. The new version appears under Available to install, tagged Latest.
- Select Install.
- Select the new version for each project that should use it.
The older version stays installed, and projects keep using it until you change their selection. Remove it when no project needs it. The SDK Manager doesn't show which projects use a version; check each project's SDK Selection row in the Ashling Project View.
Remove an SDK
Before you remove an SDK, select another SDK for each project that uses it. Projects that aren't open keep their selection, and download the SDK again the next time you open them.
- Under Installed, select the trash icon () on the SDK.
- Select Remove to confirm.
Any open project that uses the SDK stops using it. Components that another installed SDK still uses are kept. Downloaded archives stay in the downloads folder inside the SDK root folder.
Change the SDK root folder
By default SDKs are installed in .vcpkg in your home folder:
C:\Users\<you>\.vcpkg
~/.vcpkg
What changing the folder does
Nothing is moved or downloaded, and the old folder isn't deleted. The SDK Manager lists the SDKs already in the new folder. Open projects whose SDK isn't in the new folder are left with no SDK selected. Projects that are closed keep their selection, and download their SDK into the new folder the next time you open them.
To use a different folder, for example a drive with more space:
- Select Change… next to SDK Root Folder.
- Select Choose a folder…, pick the folder, and select Use as SDK location. Or select Use the default location to go back to the default.
- Select Change to confirm.
- Install the SDKs you need in the new folder, then select them for any open project that lost its SDK.
You can also set the folder in VS Code's settings: open Settings (Ctrl+,), search for ashling.sdk.root and enter the folder path. A change there applies straight away, without asking.
Where else the extension stores data
The SDK list, each SDK's download status and each project's SDK selection are kept in %LOCALAPPDATA%\Ashling\vcpkg on Windows, or ~/.ashling/vcpkg on Linux. The extension doesn't use an existing vcpkg installation or the VCPKG_ROOT variable.
Next step
Debugging hardware? Activate your licence , then set up the probe drivers. Using QEMU? Import a project