Select an SDK for a project
Each project uses one SDK. The SDK provides the compiler, build tools and GDB server for that project's builds and debug sessions. Projects imported from an SDK example are set up automatically; for your own projects, select the SDK yourself.
Select or change the SDK
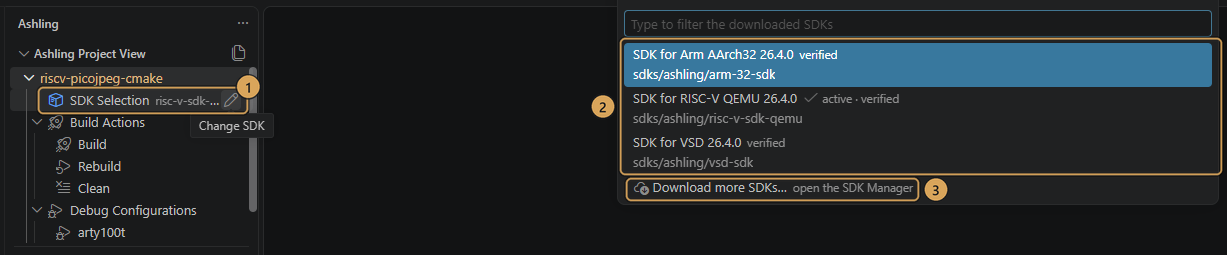
- In the Ashling Project View, expand the project and select its SDK Selection row, or the pencil icon (Change SDK) next to it ①. The row shows the SDK the project uses now.
- Pick an SDK from the list ②. The SDK the project uses now is marked active. verified means every component of that SDK passed its check in the SDK Manager.
- If the SDK you need isn't listed, select Download more SDKs… ③ to open the SDK Manager. After it is installed, select the SDK Selection row again and pick it.
A notification confirms when the SDK is active for the project.
If the project was already built with another SDK, select Rebuild under Build Actions after changing the SDK, so nothing built with the old compiler is reused.
A project needs an SDK to build and debug
Until an SDK is selected, Build, Add new debug configuration and starting a debug session show No SDK is selected. In the message, select the Select SDK button, or use the SDK Selection row.
What selecting an SDK changes
The project builds and debugs with the SDK's tools: its compiler, build tools and debugger. You don't need to change any settings or debug configurations, even when you switch to another SDK later.
Terminals you open for the project after selecting the SDK can run its tools too. Terminals that were already open can't, so open a new one.
The selection is remembered
The SDK choice is stored per project folder and survives restarts and extension updates. When you open the folder again, its SDK is activated automatically.
The choice itself is stored by the extension on this computer (in %LOCALAPPDATA%\Ashling\vcpkg on Windows, ~/.ashling/vcpkg on Linux), not in the project. Someone else opening the project selects the SDK on their own computer.
Don't commit the generated .vscode files
For CMake projects, .vscode/cmake-kits.json and the cmake.cmakePath entry in .vscode/settings.json hold absolute paths into your SDK root folder. Keep them out of version control (for example in .gitignore); they are written again whenever someone selects an SDK or builds.
The choice is remembered by the folder's path, so moving or renaming the project folder loses it. Select the SDK again after a move.
To stop the automatic activation, open Settings (Ctrl+,), search for ashling.sdk.activateOnOpen and clear its checkbox. You might do this to open a project quickly without downloading a missing SDK. After a restart the SDK Selection row then shows none, and builds show No SDK is selected, but the stored choice is kept: select the row to activate it, or turn the setting back on and it is applied the next time you open the folder.
Status text on the SDK Selection row
The row shows the SDK's short ID and version.
| Text | Meaning |
|---|---|
risc-v-sdk 26.4.1 |
The SDK is active for this project. |
risc-v-sdk 26.4.1 (activating) |
The SDK is selected and is still being activated, for example while missing components download. |
risc-v-sdk 26.4.1 (error) |
Activation failed. Select the row and pick the SDK again; if it fails, check the Ashling vcpkg output channel, which logs SDK downloads and activation. |
none |
No SDK is selected. Select the row to choose one. |
unavailable |
The extension couldn't read the project's SDK status. Check the Ashling vcpkg output channel. |